
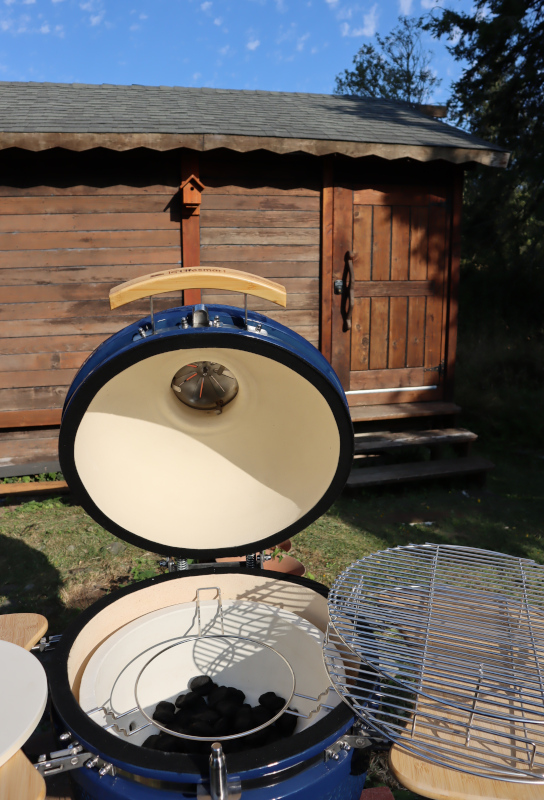
It’s Labor Day weekend, which means it’s a perfect time to fire up the grill – and we did just that by testing out our new Lifesmart 22″ Kamado Ceramic Grill for the first time! As I mentioned in my last post about the grill, Jai had been hard at work landscaping and poured a cement pad just for our new grill, because when you have a grill this show-stopping, you want to put it in a place of honor! So now that the setup was complete and we had a weekend to test it out, we were excited to see what everyone has been talking about. We ended up cooking dinner the last two nights in a row on the Lifesmart Kamado Grill and thoroughly enjoyed ourselves! The hype is real – this grill cooked our dinner to perfection without any special skills and no real prior grill experience. So in this post I’m going to walk you through the recipe I made and the process of cooking with an “Egg” grill so that you can make some crowd-pleasing BBQ before the summer ends!
A note on my recipes: All of the recipes on this site that are authored by me are are real meals from our kitchen – I don’t run my recipes through a test kitchen 15 times, and I don’t “Stage” food in a photography studio. Every recipe I photograph for this site gets eaten once I’ve snapped the photo, so the chicken you see in these images was our real Sunday night dinner! When I share these recipes, I do so the same way I might write a recipe on the back of a napkin for a friend; I take great pains to make sure I get every measurement correct and describe things accurately, but just remember that I’m not claiming to be a professional chef – so please enjoy my recipes in the same spirit that you would try to recreate your next-door-neighbor’s potato salad or your cousin’s famous pie!
Lifesmart Kamado Grill BBQ Chicken Recipe
A simple, but delectable 4-ingredient dinner that will have your neighbors begging for an invite to your next BBQ!

Ingredients:
5 lbs chicken
13 teaspoons plus one 1/4 teaspoon Chef Merito Chicken Seasoning
4 bell peppers
1 cup butter or coconut oil
Directions:
Slice the bell peppers into rings and place on a tray.
Next, you’ll want to melt your butter or coconut oil in the microwave and mix with the seasoning. I recommend melting the fat in 1/4 or 1/2 cup increments, because it will start to solidify as you’re working and need to be re-melted, and it’s easier to melt smaller quantities in the microwave. For my BBQ Chicken, I actually used a combination of both coconut oil and butter as the fat, because I just had a little bit of coconut oil left in the pantry. What I did was divide the seasoning into two bowls, and then added 1/4 cup of coconut oil to one bowl and 1/4 cup butter to the other; after I had used up both bowls, I added more seasoning to one of them and 1/2 cup butter, because I wasn’t initially sure how much fat I would need to cover everything.
Once you’ve melted your fat and seasoning mixture together in the microwave, stir thoroughly. Then, use a basting brush to begin coating the bell peppers with the mixture. Once you’ve completed basting the bell peppers, set the tray aside. Put out a second serving tray, get your chicken out of the fridge, and then begin basting the chicken with the same mixture. The key here is to be really thorough – the more you get your basting brush all around the chicken and into the nooks and crannies, the better it will taste.

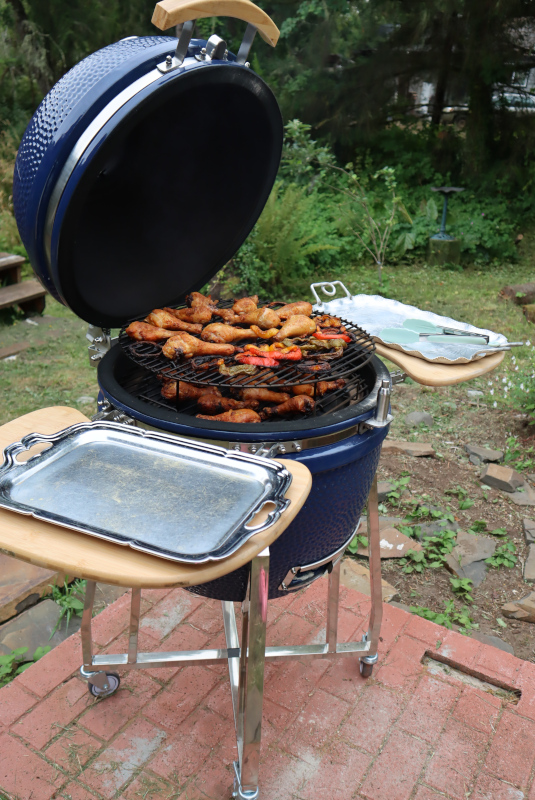
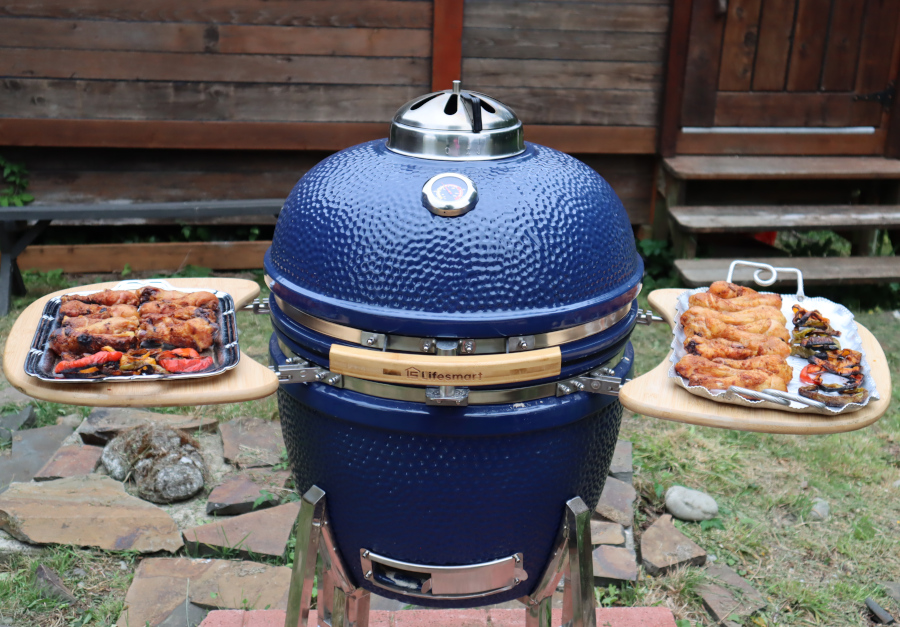
After your chicken and bell peppers are basted, it’s time to fire up the grill! Cook on a Lifesmart Kamado Ceramic Grill that has been preheated for at least 15 minutes at approximately 450 degrees. Arrange your chicken and peppers on the grill, hold the temperature at 400 degrees and cook for 30-40 minutes or until done. Pro tip: Our household grillmaster, Jai, cooked our dish for 45 minutes and it turned out very nice and crispy; however, to make it even better next time, he would recommend removing the vegetables at about 30 minutes, removing the chicken on the lower tray at about 35 minutes, and removing the remaining chicken on the upper tray at 40 minutes.
Tasting note on seasoning: The directions for using the Chef Merito Chicken Seasoning is to use 1 teaspoon of Chicken Seasoning for every 6 ounces of chicken. 5 pounds of chicken is 80 ounces, so that would call for 13 teaspoons plus one 1/4 teaspoon of seasoning. However, because I was also using this mixture to baste the bell peppers, I thought I would need additional seasoning and ended up using 22 teaspoons. But since this seasoning is so rich in flavor, that ended up being unnecessary – while dinner was good, it was a bit on the salty/over-seasoned side, so next time I’ll just use the amount recommended for covering 5lbs chicken and I’m confident that will be more than enough to cover the veggies as well.
$$$ Budget-friendly tip: This meal is very frugal – I used a 5lb bag of chicken drumsticks from Walmart that cost $4.94, and bell peppers cost just under $1 each where I am; you could also substitute any other seasonal vegetable in its place. Chef Merito Chicken Seasoning starts at $2.89. If you really need to stretch your budget, you could probably substitute margarine for butter, although I have not tried this myself.
Our dinner was oh-so-good! Both nights that we’ve cooked chicken with this grill, it’s been so tender inside that it pretty much falls off the bone, with a crispy skin outside – perfectly cooked. I feel like the Lifesmart Kamado Ceramic Grill has turned me into a true Grillmaster of the Universe! I can see now why it’s been the envy of our friends and so talked about – this is the first “Real” outdoor grill I’ve owned, and I have very little experience operating them; so the fact that we could fire this up the first time and get a four-star meal tells me why everyone loves the “Egg grill” so much! Jai watched some videos about the Lifesmart Kamado Grill before our first use, and the consensus seems to be that it takes a handful of uses to really dial in the best timing and temperatures, which makes sense – hence, our notes tweaking how long we want to cook this dish next time. I can’t wait to make another meal on this wonderful grill!

The Lifesmart 22″ Kamado Ceramic Grill has an MSRP of $1,299 and can be found at retailers like Home Depot and Lowe’s; learn more about the grill at Lifesmartproducts.com.
Pin It For Later!

Yum! I can almost taste this chicken just by reading the article and looking at the pictures. Thanks for sharing!!
Thank you for sharing
That chicken looks sooooo good! And your peppers are sliced perfectly!!! (Take it from someone who massacres the poor veggies.) I love how that grill can stack so you can double the amount of food you’re grilling!
This looks like a yummy dinner. I’m going to have to try it out. The grill itself looks handsome. I really like the color.